SmartHackly
  • Home
  • News
  • AGI
  • Open Source
  • AI Applications
  • Startups
  • Enterprise
  • Resources
  • Robotics
No Result
View All Result
SAVED POSTS
SmartHackly
  • Home
  • News
  • AGI
  • Open Source
  • AI Applications
  • Startups
  • Enterprise
  • Resources
  • Robotics
No Result
View All Result
SmartHackly
No Result
View All Result

Build AI Agent Python Tutorial: Create a Powerful Bot in 50 Lines

November 21, 2025
in Open Source
0
Share to Facebook

Build AI Agent Python Tutorial: Create a Bot in 50 Lines

Many developers want to learn how to build AI Agent Python tools without using complex frameworks. Everyone is talking about “AI Agents”—software that doesn’t just talk, but actually does things. But if you look for tutorials, you mostly find complex guides using heavy frameworks like LangChain or CrewAI.

Sometimes, you don’t need a framework. You just need to understand the logic.

In this guide, I’m going to show you how to build a minimalist AI Agent from scratch using Python. No complex dependencies, just pure logic. By the end of this tutorial, you will have a bot that can “think” about a problem and choose the right tool to solve it.

What We Are Building

We are going to build a simple “Math & Time” agent. It will be able to:

  • Identify if a user is asking for a calculation or the current time.
  • Pick the correct Python function to run.
  • Return the final answer in natural language.

Prerequisites

  • Python installed on your machine.
  • An API Key (You can use OpenAI, or a local LLM like Mistral/Ollama if you want to keep it free).

Step 1: The Setup

First, we need the standard OpenAI library. If you are using a local model (like Mistral via Ollama), the code is almost identical.

pip install openai

Step 2: Define Your “Tools”

An agent is only as good as its tools. Let’s give our agent two capabilities: calculating numbers and checking the time.

import datetime
import json

# Tool 1: Get Current Time
def get_current_time():
    now = datetime.datetime.now()
    return json.dumps({"current_time": now.strftime("%Y-%m-%d %H:%M:%S")})

# Tool 2: A Simple Calculator
def calculate(expression):
    try:
        # Warning: eval() is dangerous in production, but fine for this local test
        result = eval(expression)
        return json.dumps({"result": result})
    except Exception as e:
        return json.dumps({"error": str(e)})

Step 3: The “Brain” (The Agent Logic)

Here is where we really start to build AI Agent Python logic. We aren’t just sending a prompt; we are sending a prompt with instructions on how to use tools.

Visualizing the decision flow: User Query → Agent Decision → Tool Execution.

from openai import OpenAI

# CONFIGURATION
# Replace with your actual API Key
client = OpenAI(api_key="YOUR_API_KEY_HERE") 
# Note: If using Local LLM, set base_url="http://localhost:11434/v1"

def run_agent(user_query):
    # System prompt tells the AI how to behave
    system_prompt = """
    You are a helpful assistant. You have access to two tools: 'get_current_time' and 'calculate'.
    If the user asks for the time, reply with specific keyword: ACTION: TIME.
    If the user asks for math, reply with: ACTION: CALC [expression].
    Otherwise, just chat normally.
    """

    response = client.chat.completions.create(
        model="gpt-4o-mini", # Or "mistral" if running locally
        messages=[
            {"role": "system", "content": system_prompt},
            {"role": "user", "content": user_query}
        ]
    )
    
    content = response.choices[0].message.content
    
    # The Agent "Reasoning" Loop
    if "ACTION: TIME" in content:
        print(f"🤖 Agent decided to check the clock...")
        return get_current_time()
        
    elif "ACTION: CALC" in content:
        expression = content.split("CALC")[1].strip()
        print(f"🤖 Agent decided to calculate: {expression}")
        return calculate(expression)
        
    else:
        return content

# Let's test it!
if __name__ == "__main__":
    query = "What is 25 * 4 + 10?"
    print(f"User: {query}")
    print(f"Agent Response: {run_agent(query)}")

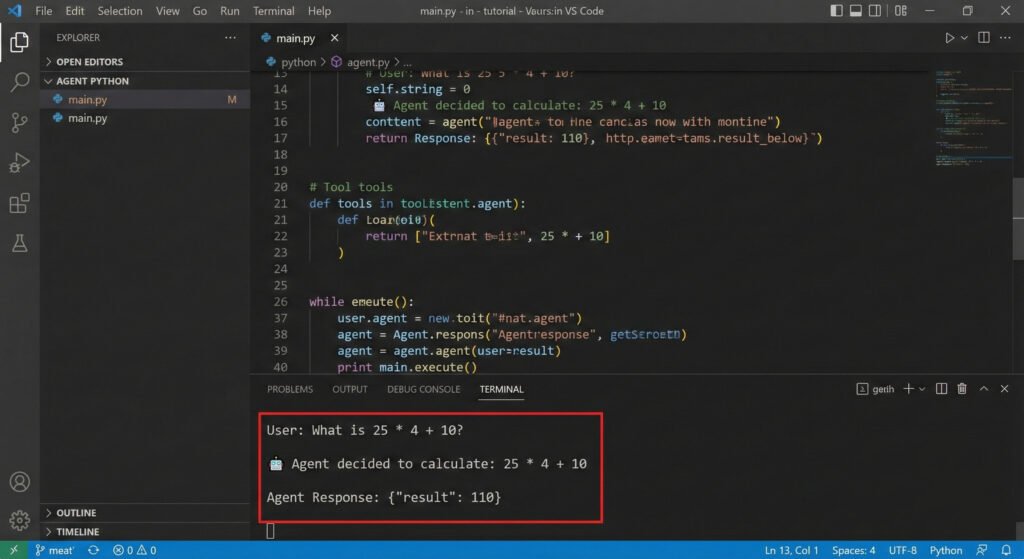
Step 4: Why This Matters

Most developers stop at print(response). But by adding that if/else logic (The “Reasoning Loop”), you have technically created an Agent.

This script detects intent (ACTION: TIME) and executes code (get_current_time()). This is the fundamental building block of complex systems like AutoGPT or BabyAGI.

Caption: Proof that the code works – Python code running a simple AI agent in VS Code.

Conclusion

Now you know how to build AI Agent Python systems efficiently. You don’t need to wait for AGI to start building smart software. Start with this script, add a tool for “Web Search” or “Email,” and you suddenly have a powerful personal assistant running on your laptop.

Tags: AI AgentsAutomationCoding for BeginnersLLM TutorialOpen SourceOpenAI APIPython
TweetShare
Aymen Dev

Aymen Dev

Aymen Dev is a Software Engineer and Tech Market Analyst with a passion for covering the latest AI news. He bridges the gap between code and capital, combining hands-on software testing with financial analysis of the tech giants. On SmartHackly, he delivers breaking AI updates, practical coding tutorials, and deep market strategy insights.

Related Stories

high-contrast featured image for a blog post titled 'What is MCP?', showing a glowing blue digital 'USB-C' style connector linking an AI brain to various database icons, representing the Model Context Protocol standard

What Is MCP? The “USB-C” Standard That Fixes Agentic Workflows (2026)

by Aymen Dev
December 10, 2025
0

If you are building autonomous agents in 2026, you are likely facing a major integration nightmare. You spend more time writing "glue code" than actual AI logic. The...

Futuristic illustration of a digital whale representing DeepSeek V3.2 overtaking a robotic ship labeled GPT-5, symbolizing open source AI beating proprietary models.

DeepSeek V3.2 Review: The Open Source Model That Just Beat GPT-5

by Aymen Dev
December 2, 2025
0

Just days after shaking the industry with R1, the Chinese AI lab has done it again. DeepSeek V3.2 has officially dropped, and it isn't just an update—it is...

Futuristic illustration of the Python logo breaking free from chains, symbolizing the removal of the Global Interpreter Lock (GIL) in Python 3.14.

Python 3.14 Released: The No-GIL Revolution for AI Developers (Deep Dive)

by Aymen Dev
December 2, 2025
0

The moment we have been waiting for since 1991 has finally arrived. Python 3.14 is officially here, and it brings the biggest architectural change in the language's history....

Split-screen illustration showing the free autonomous agent Cline with DeepSeek R1 versus a paid GitHub Copilot subscription, highlighting the switch to local AI.

Stop Paying for GitHub Copilot: How to Set Up Cline + DeepSeek R1 for Free

by Aymen Dev
December 1, 2025
0

Building a free GitHub Copilot alternative is no longer just a dream—it is a necessity for privacy-conscious developers. Let’s be honest: paying $20/month for GitHub Copilot, $20 for...

Next Post
Goldman Sachs AI market analysis chart showing tech stock volatility

Goldman Sachs Warns the "AI Boom" is Priced In: Why The Fundamentals Disagree

Leave a Reply Cancel reply

Your email address will not be published. Required fields are marked *

SmartHackly

SmartHackly delivers the latest AI news, automation trends, and productivity insights. Explore smart tools and guides to help you work efficiently in the digital age.

Recent Posts

  • ChatGPT 5.2: The Ultimate 2026 Survival Guide to Mastering Agent Workflows
  • AI Agents Vs Traditional Automation: What You Need To Know In 2026
  • How Perplexity AI Agents Are Transforming Enterprise Automation

Categories

  • AGI
  • AI Applications
  • Enterprise
  • News
  • Open Source
  • Resources
  • Robotics
  • Startups

Weekly Newsletter

  • About
  • Privacy Policy
  • Terms and Conditions
  • Contact Us

© 2025 SmartHackly - Your source for AI tools, automation insights, and tech innovation. All rights reserved.

Welcome Back!

Login to your account below

Forgotten Password?

Retrieve your password

Please enter your username or email address to reset your password.

Log In
No Result
View All Result
  • News
  • AGI
  • AI Applications
  • Enterprise
  • Robotics
  • Open Source
  • Resources
  • Startups

© 2025 SmartHackly - Your source for AI tools, automation insights, and tech innovation. All rights reserved.